How Many Miles Should a Beginner Run

One question I get a lot from new runners is, ‘How many miles should I aim for each week?

It’s a good question, but there’s no one-size-fits-all answer.

How much you should run each week really depends on your fitness level, any past injuries, and what you want to achieve with running.

I know it’s a lot to consider but don’t worry—I’ve got you covered.

Let’s break down how to approach your weekly mileage based on your experience level and running goals.

If You’re Just Starting Out or Training for a 5K

If you’re new to running or getting ready for your first 5K, it’s important to start slow

A good starting point is 5 to 8 miles a week, spread across three runs. As you get stronger and build stamina, you can gradually work up to 10 miles per week.

When I started running, I was told to keep my weekly mileage between 10 to 15 miles, spread across four days. I began with short 3-mile runs, focusing on consistency rather than speed.

You should also increase your mileage gently—no more than 10% per week—to avoid injury. Trust me, you don’t want to deal with an injury early on!

If that sounds like a lot, don’t stress about it. You can begin with a walk/run method, alternating between jogging and walking.

Just two minutes of jogging and one minute of walking for 30 minutes is a great way to start. This approach eases you into running without overdoing it.

Returning to Running After a Break

If you’ve been away from running for a while but are in decent shape from other activities, you can be a little more aggressive with your mileage.

I suggest starting with 3 to 4 miles per session at a comfortable pace.

After I took a year off due to injury, getting back into running was humbling.

I remember when a five-mile run felt easy, but even two miles left me winded after the break.

The trick was not comparing my current fitness to my peak. Instead, I focused on how good it felt to be back out there, building back up at my own pace.

Training for a 10K

If you’ve completed a 5K and are ready to push further, a 10K (6.2 miles) could be your next goal. Try aiming for 10 to 12 miles per week, with one longer run around 5 miles.

Most beginner 10K training plans suggest running 15 miles per week, divided into at least three runs.

If you’re new to running, consider following a Couch to 10K plan, which will gradually build you up to the distance.

Before my first 10K, I was nervous about pushing my mileage. After a few longer runs, my confidence really started to grow. Hitting the five-mile mark was a major milestone that showed me I could go farther.

Top view athlete runner training at black road in black sportswear at central position. Muscular fit sport model sprinter exercising sprint on city road. Full body length of Caucasian model.

Preparing for a Half Marathon

Preparing for a half marathon takes a steady increase in mileage over a few months. Stick to the 10% rule—don’t increase your weekly mileage by over 10%. Aim for 20 to 25 miles per week for a half marathon, with a long run making up about 20-30% of that total.

The long run should be slow and steady, focusing more on time spent running rather than speed. This helps prepare your body for race day without overloading it.

Training for a Marathon

Training for a marathon is a different ball game. For this, you’re looking at 25 to 30 miles per week, gradually increasing your weekly long runs. Make sure to spread your tough runs out over the week to avoid injuries..

I’ll never forget training for my first marathon. The first few weeks were manageable, but I started to feel the grind when my weekly mileage hit the 30-mile mark. One Saturday, I had to tackle an 18-mile long run, and it nearly broke me.

But finishing it gave me a massive sense of accomplishment. Trust me; tapering before the marathon was crucial—it helped my body recover and peak on race day.

Frequently Asked Questions (FAQ)

I know you have more than a few questions regarding average mileage for beginners. Let me try to answer some of the most common ones.

How many miles should I run in my first week?

For most beginners, starting with 6-8 miles in the first week, split over 2-3 runs, is a good benchmark. This manageable distance lets you build a routine without overloading your body. Adjust based on how you feel—if you’re finding it too easy or challenging, you can fine-tune your weekly mileage until it feels right.

How can I safely increase my weekly mileage?

The safest approach is to increase your weekly mileage by no more than 10% each week. This gradual increase helps your body adapt and reduces the risk of injury. So if you run 8 miles in the first week, aim for around 9 miles in the second week, adding just a little extra distance to one of your runs. Slow and steady is the name of the game for sustainable progress.

Here’s a sample progression that keeps mileage increases conservative to help avoid injury:

  • Week 1: Start with 6-8 miles spread over 3 days (e.g., 2 miles per run).
  • Week 2: Increase to 8-10 miles, keeping 1-2 rest days between runs.
  • Week 3: Try 10-12 miles, adding a slightly longer run for stamina.

This approach will get you closer to your goals without overloading your body.

Want a Full Beginner Running Plan? Check out our guide: Beginner Running Plan for a detailed weekly breakdown.

How can I tell if I’m running too much as a beginner?

Some signs that you may be overdoing it include persistent soreness, fatigue that doesn’t go away after rest, or an increased risk of injury, such as shin splints or joint pain. Pay attention to how you feel—if you’re extra tired or have aches that stick around, it’s probably time to cut back a bit and rest more

Final Thoughts: What’s my ideal weekly mileage?

The right weekly running distance varies based on your goals and fitness level.

As a beginner, it’s crucial to start slow and gradually build up.

Whether prepping for a 5K, a half marathon, or a full marathon, listen to your body and progress at a pace that feels right for you.

Running is a journey—don’t rush it. Enjoy the process, stick to a plan, and you’ll be surprised at how much you can accomplish. Keep training strong, and the rest is just details!

Got questions or need advice? Drop them below—I’m here to help!

David D.

Run Without Limits: How to Prevent and Manage Ankle Pain In Runners

black toenail from running

Dealing with ankle pain is a common concern for many runners. If left unaddressed, it can become a persistent issue that affects your running performance and overall mobility. The key to managing ankle pain effectively is prevention.

By taking the right steps to prevent ankle issues, you can reduce soreness and discomfort and maintain your running health.

In this article, we’ll explore important information about the ankle joint and share tips on preventing and managing ankle pain.

So, let’s dive in and discover how to keep your ankles in great shape for running!

The Ankle Joint

The ankle joint is a sophisticated and intricate structure composed of various components, including bones, ligaments, tendons, and cartilage. This joint’s primary components are the fibula, tibia, and talus bones, which work in unison to create the ankle joint.

Specifically, the ankle joint is formed at the talocrural joint, which serves as a synovial hinge joint that connects the distal ends of both the fibula and tibia in the lower limb. This complex arrangement allows for the ankle’s pivotal range of motion, facilitating actions like walking, running, and various weight-bearing activities.

The Primary Movements

The ankle joint is responsible for facilitating several key movements that are essential for various activities, especially in runners:

  • Plantarflexion: This motion involves moving the foot away from the body, pointing the toes downward.
  • Dorsiflexion: This movement brings the foot closer to the body, flexing the ankle and pointing the toes upward. Additionally, the ankle joint allows for side-to-side movements, primarily:
  • Eversion: Turning the sole of the foot outward.
  • Inversion: Turning the sole of the foot inward.

While these movements are crucial for activities like walking, running, and jumping, the ankle joint often bears a significant amount of weight during weight-bearing activities. For runners, this can lead to a heightened risk of ankle injuries.

To put this into perspective, research from the American College of Sports Medicine’s Health and Fitness Journal reveals that the average runner takes approximately 1,700 steps per mile when maintaining a pace of 10 minutes per mile.

The exact number of steps can vary based on factors like stride length, height, and running speed, but it underscores the substantial stress placed on the ankle joints during running.

As a result, runners may encounter ankle issues from time to time, with ankle sprains being a common concern.

Ankle sprains are prevalent, with approximately 25,000 Americans experiencing a sprained ankle daily. Research from the University of Bern in Switzerland also highlights that ankle injuries account for around 30 percent of all running-related injuries.

How To Prevent Ankle Pain In Runners

Without further ado, here’s how to prevent ankle pain in runners.

Strengthen Your Ankle Joint

Strengthening the muscles around your ankle joint is essential for maintaining stability and preventing potential issues, especially for runners who may experience ankle instability. Weakness in the ankle muscles, particularly those on the outer side, can increase the risk of pain and injuries.

To ensure a well-rounded approach to strengthening your ankles, focus on exercises that target all four directions of ankle movement: dorsiflexion (lifting the toes toward your shin), plantar flexion (pointing the toes away from your shin), eversion (turning the sole of the foot outward), and inversion (turning the sole of the foot inward).

Aim to incorporate these exercises into your routine by performing 12 to 16 repetitions of each exercise three times a week for a duration of two months. If you frequently run on trails or uneven terrain, consider increasing the frequency of these exercises to build greater ankle strength and stability.

Here are four effective ankle-strengthening exercises to include in your routine:

  • Ankle Circles: Perform controlled circular motions with your ankles, both clockwise and counterclockwise, to work on a range of motion and stability.
  • Ankle Alphabet: Write the letters of the alphabet in the air with your toes to engage different ankle movements and enhance muscle strength.
  • Calf Raises: Stand with your feet hip-width apart, then raise your heels as high as you can while keeping the balls of your feet on the ground. Lower your heels back down and repeat.
  • Shin Raises: Sit on the floor with your legs straight out in front of you. Place your hands on the floor slightly behind your hips, fingers pointing away from your body. Lift your toes and the front of your feet off the ground as high as possible while keeping your heels on the floor. Lower your toes back down and repeat.

Balance Training

In addition to strengthening the muscles around your ankles, it’s crucial to improve your proprioception, which is your body’s ability to maintain balance and control in various positions. Strong muscles alone may not be sufficient if your proprioception is lacking, so incorporating balance training into your routine is essential for overall ankle stability.

Balance training involves the coordination of muscles and the brain to provide better support and stability to the ankle joint. Here are some balance training exercises to help enhance your ankle proprioception:

  • Single-Leg Balance: Stand on one leg and try to maintain your balance for one minute. To make it more challenging, you can close your eyes or perform this exercise on an uneven surface.
  • Unstable Surface Balancing: Take your balance training to the next level by practicing on unstable surfaces like a dynamic disc, foam pad, or Bosu ball. Balancing on these surfaces forces your muscles and nervous system to work harder to maintain stability.
  • Wobble Board Exercises: Wobble boards are specialized tools designed for balance training. You can perform various exercises on a wobble board, such as balancing on one leg while tilting the board in different directions.

By consistently incorporating these balance training exercises into your routine, you’ll not only strengthen your ankle muscles but also improve your proprioception, ultimately enhancing your overall ankle stability. This can be particularly beneficial for runners, as it helps reduce the risk of ankle injuries and improves running efficiency.

Avoid Running On Uneven Surfaces

Running on uneven surfaces, like trails with tree stumps, rocks, and roots, can increase the risk of ankle sprains and contribute to ankle pain. To prevent this, it’s best to stick to smoother terrains like dirt and even roads, especially if you have chronic ankle pain.

Choose your running surface wisely and be cautious when encountering hills with loose gravel and rocky terrain to protect your ankles and prevent potential injuries.

Cropped shot of a young man holding his ankle in pain while running.

Run In The Right Shoes

Going for running shoes that match your foot type and the terrain you’ll be running on is crucial. For individuals with pronation or low arches, opt for shoes that offer ample support in the front and under the arch, with a stable heel and heel counter.

Choosing shoes with good grip and a low profile can help prevent ankle injuries on slippery or technical surfaces.

Additionally, remember to replace your running shoes when the heels or tread show signs of wear and tear, typically every four to six months or after covering around 400 to 500 miles to maintain optimal performance and reduce the risk of ankle pain and injuries.

Overuse

Overuse is a common culprit when it comes to ankle pain in runners. Pushing your body too hard, logging excessive miles, and overtraining can strain your muscles and increase the risk of injuries like strains, sprains, and inflammation.

To prevent overuse injuries, it’s essential to gradually increase your training load, incorporate rest days into your routine, and listen to your body’s signals. If you experience persistent ankle pain during or after running, it’s crucial to reduce your training intensity or take a break to allow for proper recovery.

If the pain persists despite rest and self-care measures, it’s advisable to consult a medical professional to rule out any underlying injuries or conditions.

The 6 Yoga Poses For Injury Free Running

yoga for injury free running

If you do any running, you know that, sooner or later, injuries happen.

Surveys show that more than half of all runners suffer from at least one injury per year, mostly due to body imbalances and the repetitive high impact motion.

To stay injury-free and active, you’d need corrective modalities to fix muscular imbalances, and prevent overuse injuries.

As far as I can tell, yoga is one of the best exercises to helps improve mobility, flexibility, strength, and agility, as well as speed up recovery from high-intensity training.  That’s a bunch of good things if you ask me.

It’s undoubtedly one of the most dynamic returns on investment out there.

In today’s post, I’m sharing with you some of the best yoga poses to keep you pain-free and enjoying every stride this running season.

What’s more?

The poses shared below require no previous experience.

Not only will these help you recover faster, but they also improve your range of motion and running performance. What’s not to like.

Try to practice the following routine for 15 to 20 minutes to cool down, hold each asana for five to ten breaths to get the most out of it.

And remember not to push your body beyond its comfort level as doing increases the odds of injury—and that defeats the purpose of yoga in the first place.

runner doing yoga

Yoga For Injury-Free Running – 1: Cross-Legged Forward fold

Begin by sitting tall on a mat with back flat and legs crossed in front of you. Sit on a bolster or the edge of a firm blanket if your hips are very tight.

Next, while keeping your knees wide, place your palms on the ground in front of your legs, then walk then forward as you allow your spine to curve naturally. Keep your head, neck, and shoulders relaxed throughout the stretch.

Keep the pose for five to ten breaths.

Additional resource: Need more yoga exercises and routines? Then try a yoga studio software.

Yoga For Injury-Free Running – 2: Downward Dog

Begin on all fours, shoulders above your wrists and hips above the knee, and the latter slightly behind your hips.

Next, spread your fingers, bring your hands slightly forward, then press your palms into the mat and gently tuck your toes, lifting your knees off the ground and straightening your legs as much as possible.

Breathe deeply for ten times.

Yoga For Injury-Free Running – 3: Cobbler Pose

Sit on the mat with your legs straight out before you. Use a bolster if your hips are too tight. Then, bring the soles of your feet together as close to your pelvis as possible, with hands holding the feet.

Next, place your hands on the ground, lean forward, and gently allow your knees to fall away from each other, stretching your inner thighs for five to ten breaths.

Make sure not round your back. Instead, keep your spine long as you lower down.

Yoga For Injury-Free Running – 4: Bridge Pose

Begin by laying on your back, knees bent, and feet flat on the floor hip-width apart.

Next, while engaging your core, press your feet into the ground and lift your hips, rolling your spine off the mat. Squeeze your knees together to keep your knees hip with apart.

Hold the pose for five to ten breaths then slowly lower down to starting position.

Yoga For Injury-Free Running – 5: Reclining Spinal Twist

Start by lying comfortably on your back, then bend your knees into your chest, and extend your arms out alongside your body.

Make sure your body is forming a “T” formation, with your palms facing up toward the ceiling.

Next, extend your left leg, so it is lying on the mat, then guide your right knee with the left hand, slowly bring it toward the mat on the left side of your body. Extend your arms out to the sides, palms facing down.

Extend your right arm out to the right side and gently turn your head to gaze over the right fingertips.

Remain in the twist for five to ten breaths, then come back up to center, then change sides.

Yoga For Injury-Free Running – 6: Legs up the Wall

Begin by laying on your back with sit-bones as close to a wall as it is comfortable for you.

Next, while letting your arms rest open at your sides, palms facing up, extend your legs up the wall. Feel free to place a folded blanket or pillow under your hips to release any tension in the low back or hamstrings.

Let your head rest on the ground and place your arms where they feel most comfortable. Stay anywhere from three to ten minutes. Just don’t fall asleep.

Beginner’s Guide to First Aid For Runners

tough runner training through pain

What would you do if you sprain your ankle while running?

How would you handle a gushing wound after a fall?

How to keep yourself safe when running in the heat?

If you have no idea what to do in these situations, then today you’re in the right place.

Even though pounding the pavement (or the trails) isn’t a contact sport,

often trouble is just one foot strike away.

Being exposed to the elements increases your risk of injury or accident, whether due to a pre-existing condition, lack of physical fitness, or simply not paying attention to the road.

For these reasons, if you exercise outdoor a lot, know some first-aid. That’s how you’ll be able to address your own injuries before you get home and/or reach out for help.

Whether it’s a nasty fall, sprain, blister, or something more dangerous, here’s your guide on how to deal with common running nightmares on the road.

Note—Getting a good base in first aid is not something you can learn in a blog post, as it requires long hours of training and practical experience, but the guidelines shared below should you get started on the right foot.

Beginner’s Guide to First Aid For Runners

A properly stocked first aid kit is key for treating minor injuries both on the go and at home.

You can buy a whole set or throw together your own kit by getting all the items at a well-stocked drug store.

Ask the pharmacist for assistance.

A runner’s first aid kit should include the following:

  • Adhesive bandages in different sizes
  • Alcohol wipes
  • Allergy medicine
  • Aspirin
  • Antibiotic ointment
  • Antibacterial wipes and hand sanitizer
  • Bug spray
  • Disposable razor
  • Elastic bandages
  • Latex-free gloves
  • Scissors and tweezers— for splinter or stinger removal
  • Fold-up plastic water bottle
  • Meds, especially if you have any pre-existing issues

Of course, you may not have all these supplies at your fingertips, but it always helps to be prepared.

Now let’s get to the practical stuff.

Sprains

Sprains are a common outdoor injury that can cause swelling, pain, and bruising.

They happen when you lose your footing while cruising along some uneven terrain or tackling a rocky edge.

That’s why ankle sprains are pretty common among trail runners.

Your Next Step

Depending on how serious you sprained your ankle, you may able to hobble home.

Whatever the case, make sure you listen to your body and stop moving altogether if you have to.

If weight-bearing is out of the question, call a taxi.

Also, keep a stretchy bandage to stabilize any sprains.

As a rule, rest, apply ice therapy and elevate the injured joint.

This simple self-care procedure can help limit swelling, fluids build-up, and bleeding in soft tissue injuries.

If symptoms don’t improve within two to three days, seek medical help for possible X-rays and assessment for fracture.

Prevention

Avoiding sprains when running ain’t easy, especially on the trails.

But you can always avoid running on technical terrains, improve your form, strengthen the muscles surrounding your ankle joint, and pay attention to your footing.

For more, check this post.

Falling & Bleeding During a Run

Falls resulting in serious cuts and wounds are common among runners, and if you take a tumble, knowing what to do next can help minimize long term damage.

A simple fall can lead to an open wound that can halt your training for the day.

And in some cases, an especially bad fall could result in a severe bleed.

Never ignore open wounds, no matter how badass they make you look like

Your Next Step

When you take a terrible fall while running, focus on controlling the bleeding first, then cleaning and protecting the injured limb.

Don’t have any first-aid tools at hand?

Use your sweatbands and extra-base layers, especially if the wound is gushing.

Take them off and press firmly over the injury until the bleeding ceases.

Putting pressure on an injury constricts the blood vessels, which limits circulation to the area, therefore, the less blood flow, the less bleeding.

Once you get home, clean the area with warm, soapy water and hydrogen peroxide before bandaging it to prevent infection.

To keep the area moist, use plain petroleum jelly or antibiotic ointment.

Additional resource – Trail Running First Aid Kit 

Prevention

When running outdoor, pay attention to your surroundings and keep an eye out for protruding roots, loose stones, sharp rocks, and anything else that could trip you over.

What’s more?

Wear running shoes offering support for your running terrain.

First aid For Runners

Blisters On A Run

Blisters are common, posing no serious threat, but they can mess up with your workout if you don’t deal with them ASAP.

This annoying condition occurs when the skin is continuously rubbed against another surface, whether it’s the skin itself, clothing, or the inside of your running shoes.

Your Next Step

I know.

It’s the most tempting thing in the universe to burst a blister, but it’s best to leave it alone.

The skin acts as a fantastic barrier to infection, but popping a blister may make the injury worse, increasing your risk for infection.

And you don’t want that.

Instead, cover the blister with plaster and make sure there are no wrinkles in the sock that may cause rubbing.

In case of a blister outbreak, shield it with a clean, non-adhesive, and dry dressing that stretches beyond the edges of the blister.

Prevention

Run in suitable shoes that fit well with no pressure points, and have been well broken in, especially when running long and/or hard.

Go for socks that offer good support, avoiding cotton materials as it retains moisture.

Also, use foot powder spray to keep your feet dry and comfortable.

Heat-induced Issues

Heat-related illnesses are dangerous and can be a question of life or death.

These occur when your body retains too much heat, resulting in an abnormal increase in body temperature.

Heat exhaustion, heat cramps, or heatstroke can happen to any runner who trains in the summer heat for too long.

The symptoms

  • Elevated heart rate
  • Flushed skin
  • Dizziness
  • Dry throat
  • Dehydration
  • Confusion

Your Next Step

If you’re experiencing a couple of more of these symptoms, slow down or stop training altogether.

Find a shady area, lie down with your legs raised, and drink some fluids, especially an electrolyte solution.

Ideally, you should also call someone to come and be with you and get medical attention.

If possible, apply cold packs to your groin, armpit, behind the knees, and the back of your neck to remove the heat and bring your core temperature down.

Seek medical attention if symptoms do not improve, especially if vomiting develops.

Your doctor may use cool intravenous fluids, which help lower the temperature in the bloodstream.

Prevention

Drink plenty of water, choose “shady” running routes,  and avoid running in the heat, especially during the summer between the times of 10 am to 4 pm.

Conclusion

As previously stated, today’s post is by no means the full guide to first aid skills, but I believe these simple guidelines covers some of the most common issues that runners will face out there.

That said, I’ll strongly advise you to learn more about the subject, and take a course (if you have the time to do so).

Knowing more about the subject not only comes in handy when you run into trouble, but you could also use the knowledge to help someone else.

And you can’t put a price tag on that.

Please feel free to leave your comments and questions below.

In the meantime, thank you for dropping by.

Keep Running Strong.

David D.

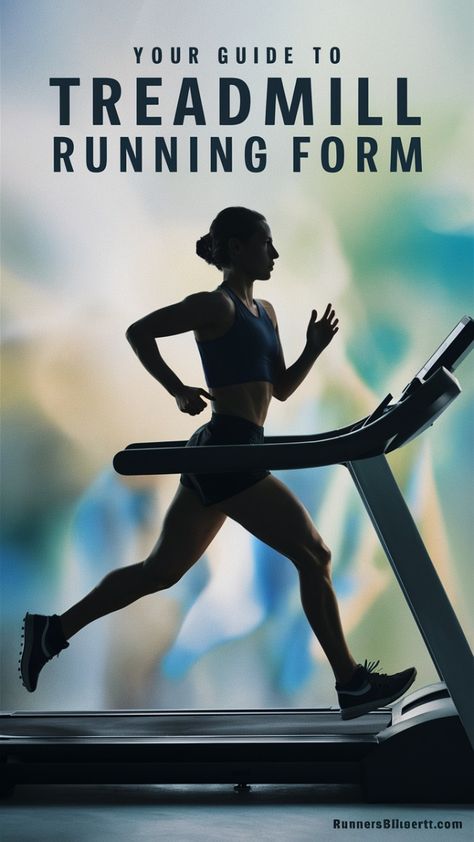
Your Guide To Treadmill Running Form

How to Run On a Treadmill

Struggling to match your outdoor running efficiency on a treadmill? Don’t worry, you’re not alone.

Whether you’re a seasoned runner looking to avoid the elements or a newbie starting off in the gym, mastering your treadmill technique is key to optimizing your workout and avoiding injury

Let’s be real: your running form is the key to getting the most out of your treadmill workouts. Running with good technique improves your efficiency and reduces your risk of injury, whether outdoors or pounding the belt indoors at the gym.

I cannot emphasize this enough.

I’ve talked before about the principles of proper running form, but today, I’m shifting the focus to treadmill-specific running techniques.

This guide is for you if you want to maintain a steady pace and keep your joints safe while getting the most out of your treadmill sessions.

Start with a Good Posture

Before you press ‘start’ on the treadmill, take a moment to check your posture. Proper alignment from the get-go sets the stage for a successful and pain-free run.

When I started running on the treadmill, I had terrible posture. I didn’t realize how much it affected my performance until my lower back started acting up.

After reading up on proper running form, I focused on keeping my feet hip-width apart, engaging my core, and lengthening my spine. It felt weird at first, but after a few runs, it became natural. Not only did my back pain disappear, but my runs also felt more efficient.

Here’s what to keep on mind:

  • Ensure your feet are hip-width apart,
  • Keep your toes are pointing forward,
  • Keep your core is engaged, and
  • Keep your spine is lengthened.

I hate to sound like a broken record, but proper posture sets the foundation for a successful run. You don’t want to hunch or slouch right from the get-go—that’ll only lead to discomfort later.

Avoid Hunching

One of the most common mistakes I see people make is staring down at their feet or fixating on the treadmill’s dashboard.

I’m also guilty of this. I used to constantly look down at the treadmill’s dashboard—checking my pace, time, distance… you name it. But after a while, I noticed that my neck and shoulders were always sore after a run. It wasn’t until I learned to keep avoid hunching that the soreness disappeared.

Here’s what you need to do: keep your head up and eyes forward, as if you’re scanning the horizon on an outdoor trail.

Simulate Outdoor Running

Treadmill running should mimic your outdoor running form as much as possible. Keep your back straight, look forward, and pay attention to your stride length—don’t shorten or lengthen it just because you’re on a treadmill.

Want to make it even more realistic? Add a slight incline of 2-3% to replicate your natural resistance when running outside. I routinely set the incline to 2% or 3%, and I feel like I’m getting a workout closer to my outdoor runs.

Plus, it’s a great way to prepare for hilly terrain without leaving the gym.

Let Go Of The Rails

I get it; sometimes fatigue sets in, and it’s tempting to hold onto the treadmill’s handrails.

I’ll admit it—I used to hold onto the handrails during treadmill runs. It made me feel more stable.

But trust me, it’s better not to. Holding onto the rails changes your natural running form and can increase your risk of injury.

Instead, rely on your arms for balance.

Plus, when you engage your upper body, it helps tone your arms and core.

So, let go and let your arms do some of the work!

Use Your Arms

Speaking of arms, ensure they work with you, not against you.

I felt a huge difference once I started focusing on my arm swing.

Before, my arms would move randomly, or I’d barely swing them at all. Now, I keep them at a 90-degree angle and let them naturally swing as I run. It helps me stay balanced and keeps my whole body in sync. This coordination not only keeps you balanced but also boosts your overall running efficiency

Strike Right

Your foot strike on the treadmill should be the same outdoors. Aim to land on the ball of your foot, not your heel, and ensure your feet are landing under your body, not out in front or behind. Short, choppy strides are tempting on a treadmill, but try to keep your natural stride. If something feels off, slow down and check your form.

No Forward-Leaning

While leaning forward a bit when running outdoors is natural, you don’t need to do that on a treadmill. The machine is already pulling your feet backward, so leaning too far forward can cause strain on your back and neck. Keep your body upright to avoid discomfort or injury.

Run in The Middle

Another common mistake is running too close to the console at the front of the treadmill.

I’ve found myself many times running running way too close to the front of the treadmill, almost bumping into the console, which is the recipe for disaster.

My best advice? Try to run in the middle of the belt, about a foot away from the console,. This allows for a more natural arm swing and help you stay balanced, especially during longer runs.

It also gives you enough room to move freely.

What’s not to like, really!

Relax

Relaxing your body while running is just as important on a treadmill as outdoors. Keep your shoulders loose, unclench your jaw, and focus on breathing.

Deep, controlled breaths will help you stay relaxed and prevent unnecessary tension, which can lead to discomfort or injury.

I’d recommend checking in with my body during a run—relaxing your shoulders, unclenching your fists, and focusing on deep breaths. This should help keep you comfortable and relaxed, even during tough workouts.

Common Treadmill Running Mistakes (and How to Fix Them!)

Even seasoned runners can slip up on treadmill form, especially if they’re not used to the stationary feel. Here are some of the most common treadmill mistakes I see—and how to correct them to keep your runs safe and effective.

Holding onto the Handrails

Gripping the handrails might feel natural, especially on a higher incline, but it actually disrupts your form and balance. It can also strain your shoulders and back over time.

Fix: Lower the incline until you feel comfortable running without holding on. Keep your arms bent at about a 90-degree angle and swing them naturally as you would on outdoor runs. This helps engage your core and improves overall balance.

Overstriding

Overstriding—landing with your foot too far in front—can create impact forces that stress your knees and hips. This is a common issue for runners who haven’t adjusted to the treadmill’s consistent pace.

Fix: Focus on landing your foot directly beneath your body with each step. To prevent overstriding, try increasing your cadence to around 170–180 steps per minute, which often naturally shortens stride length and keeps your form efficient.

Excessive Leaning Forward

Leaning too far forward can throw off your alignment, causing lower back strain and disrupting your stride. This is especially common when runners try to match the belt’s speed and lose track of posture.

Fix: Think about running tall, as if a string is pulling you up from the top of your head. Keep your gaze forward (not down at the treadmill console!) and your shoulders relaxed. Engaging your core can also help you maintain an upright posture throughout your run.

Running Too Close to the Front of the Belt

Staying too close to the treadmill’s front panel can restrict your movement and affect your natural stride. It may also cause you to tense up, impacting your form.

Fix: Position yourself in the middle of the belt, allowing for natural movement. If you’re worried about slipping back, start at a slower speed and build up gradually until you feel comfortable in the center.

Ignoring Incline Settings

Running on a completely flat treadmill can feel unnatural, as outdoor running usually involves some degree of incline. A slight incline can better mimic outdoor running and reduce the risk of joint strain.

Fix: Try setting the treadmill at a 1-2% incline to simulate outdoor conditions. This small adjustment improves your form and can help prevent shin splints by reducing the repetitive impact of flat running.

Research-Backed Insights on Treadmill Running Form

Good treadmill form isn’t just about looking smooth—it’s about running safely, efficiently, and effectively. Research backs up the importance of form when you’re on the treadmill, especially if it’s a regular part of your training. Here are some science-backed insights to keep in mind:

Treadmill Running’s Effect on Muscle Activation

Studies have shown that treadmill running slightly changes the way your muscles engage compared to running outside. According to a
study published in Medicine & Science in Sports & Exercise, treadmill running can reduce the activation of hamstrings by about 10–15% compared to outdoor running, which could lead to muscle imbalances if not managed.

By staying aware of your form—like maintaining a midfoot strike and keeping your posture upright—you can help reduce these imbalances and protect your muscles over the long term.

The Value of Cadence and Shorter Strides

Maintaining a quick cadence and shorter strides can also benefit your form and reduce joint stress on the treadmill. A
study from the Journal of Sports Science found that runners who kept a cadence of around 170–180 steps per minute on a treadmill had lower ground reaction forces, which translates to less impact on the knees and ankles. This cadence can help you avoid overstriding, making your run smoother and more sustainable, especially during longer sessions.

Conclusion

And there you have it! Running on a treadmill might feel different at first, but with the right form, it can be just as effective—if not more so—than running outdoors.

By focusing on posture, staying relaxed, and using proper technique, you’ll get the most out of your treadmill sessions while reducing the risk of injury.

If you’ve got any questions or need more tips on treadmill running, feel free to leave a comment below!

Thanks for stopping by, and as always, keep running strong!

David D.

The 6 Must-Have Running Gadgets

Running Gadgets

Running is one of the most convenient and simple forms of aerobic exercises in the world.

You can do it virtually anywhere without needing a gym or fancy gear.

That said, technology can improve almost everything we do—running is no exception.

Thanks to the massive growth of fitness wearable technology, running gadgets have become a training necessity.

Whether you’re looking to measure your training data, have the upper hand over your competition, or you want to put technology to your advantage, many gadgets will meet your needs and help you reach your goals. If you’re also interested in improving your recovery and flexibility, you might want to explore the best mobility app, which can offer a tailored approach to enhancing your performance.

The Running Gadgets You Need To Have

In today’s post, I’ve put together a list of the must-have running-related gadgets and tools to help you run your best for the year ahead.

With these gadgets, you can keep track of your pace, monitor your heart rate, protect your body, learn how to be efficient, and so much more.

Enjoy

  1. A GPS watch with Heart Rate Monitor

If you’re into analyzing training metrics, you’ll love GPS watches.

With a GPS watch, you can track all kind of information.

You can monitor your pace, training time, distance, calorie burn, and how to get back to the starting point, and so much more.

Also, look for sweat-resistant rubber watch straps that won’t irritate your skin while you’re working out.

This makes them great for a variety of different exercises—not just running.

Your exact choice is a matter of your training goals and budget.

Remember that the most expensive brand isn’t always the best gadget for achieving your running goals.

The Price

You can find GPS watches in a wide range of prices and style—guaranteed to fit any budget or personal preference.

The usual prices range from around $100 and run s high as $1000 or more.

The more you spend, the more features you get.

2. Wireless Headphones

Research has revealed that listening to music while exercising can keep you in the zone for longer and help you improve your training performance and experience.

That’s one reason why investing in a proper set of running headphone is worth it.

That said, your standard smartphone earbuds do not make the cut.

Instead, you’ll need a set of proper running wireless headphones if you’re serious about making the most out of music when running.

Ask yourself the following when choosing your next running headphone:

  • Are they waterproof/sweatproof?
  • Are the volume controls easily adjustable?
  • Are they compatible with running apps?
  • Are they light enough that they won’t bounce around while running?
  • Do they provide a secure fit so you can get lost in the music while pounding the pavement?

If a given set does not meet a couple of more of these requirements, then keep looking.

Additional resource – Prescription Glasses for runners

woman runner headphone

The Price

Again, there are many wireless bud options for runners in a wide range of prices and styles.

It’s all up to you and how much you’re willing to shell out on a pair.

In general, they can set you back by $40 to $150.

Remember to give them a test run inside the store before you make the purchase.

3. Knuckle Lights

If you have a full-time job and kids to look after, hitting the pavement early morning or later in the evening are often the only options you got for logging in your miles.

If you want to ensure excellent visibility when braving the dark outdoors, then knuckle lights are precisely what you need.

Knuckle Lights are designed to be worn on the outermost part of the hands, in the ideal position to illuminate the entire area in front of you.

Make sure to pick ones that are lightweight, waterproof, and come with adaptable straps so you can make them fit comfortably around your knuckles while running.

Price Range

Expect to pay about $30 to $40 for a good set of knuckle lights.

4. Foam Roller

Pounding the pavement places your muscles and fascia under a constant process of breakdown.

This can cause inflammation and irritation to the connective tissues surrounding your muscles, resulting in tight muscles and a host of mobility issues.

Here’s the good news.

Known as “poor man’s massage,” foam rolling is exactly what you need to fix this damage.

This handy tool can help you dig deep into your muscles to break up scar tissue, speed up recovery, and improve overall mobility.

Foam rolling is a type of self-myofascial release, or in other words, a soft tissue massage.

It places pressure on the soft tissue to increase blood flow, release tightness, promote muscle recovery, and so much more.

More specifically, the foam roller directly targets your facia.

This is a fibrous layer of connective tissues that encloses all of the muscles in your body.

The Price

Unlike some of the other items, a foam roller is pretty affordable, costing about $10 to $30, depending on the size you want.

Running Gadgets

5. Yaktrax

Are you a serious runner who wants to keep hitting the pavement all year long?

I got the perfect solution for that.

Yaktrax devices consist of slips that attach themselves to your running shoes.

These provide enough grip to allow for walking and running on ice and/or snow-covered streets and trails.

This should increase training consistently and keep your training year-round.

A good set should be super light to the point that they don’t interfere with your stride.

Price Range

Yaktrax devices are priced within the $20 to $40 range.

6. A Running Belt

A running belt is more than a fashion statement.

It’s is a training necessity that helps store your water bottle, iPod, keys, and pretty much anything else you’d need to bring along while running.

Choose a belt that sits comfortably against your body so that you don’t have to worry about it bouncing around on every step you take.

The belt should have adjustable straps and buckles.

Price Range

Prices differ widely starting from $10 to up to $50 or more, depending on your own needs and preferences.

Conclusion

There you have it!

The above gear items are some of my best suggestions if you want to use a few tools to improve your running experience and training without breaking your bank.

Make sure to pick whatever gadget you feel like you need it the most in your life.

The rest is just detail.

Please feel free to leave your comments and questions in the section below.

In the meantime, thank you for reading my post.

Keep running strong

David D.

Overweight Guide To Starting A Workout Plan

fat runner training

Starting a workout routine from scratch can be quite tricky for everyone, but it’s especially challenging for those with too many pounds to lose.

If your current weight places you in the morbidly obese category, exercising can come with some extra, unwanted, challenges, and hurdles.

Almost every movement you make puts excessive pressure on your joints.

Being morbidly obese may also mean that you’re dealing with metabolic issues.

This might be putting you at great risk for certain health conditions, such as heart disease, high blood pressure, stroke, type II diabetes, cancer, etc.

Overweight Guide To Starting A Workout Plan

In today’s post, I’ll share with you some of my best thoughts and suggestions on how to start an exercise habit when you’re obese and how to make your new habits sustainable.

By starting the right way—choosing a workout you enjoy, cultivating a positive mindset, and taking your time—getting on the workout path as an overweight fellow can be easier than you think.

Enjoy.

*Disclosure: This post may contain affiliate links that at no additional cost to you. I only recommend products I’d use myself and all opinions expressed here are our own. 

  1. Get Walking

Before you hit the gym or pound the pavement, it’s vital to bring more movement into your life.

That’s why, as far as I can tell, the best stepping stone to the world of exercise is walking.

Walking can be done almost anywhere by everyone with little gear required, and it can vary in both intensity and duration.

Start by walking just 20 to 30 minutes a day, three times per week.

As you get fitter, increase it to 45 to 60 minutes.

Keep extending your walks over time.

For more challenge, opt for routes with more hills or go for long hikes on trails: the more intensity, the better off.

2. Try Aqua jogging

Try aqua jogging—especially if lap swimming is too challenging or couldn’t find any aerobic water classes nearby.

This exercise involves wearing a flotation device around your midsection and then mimicking the running motion by moving your arms and legs back and forth in the deep end of the pool. This is ideal for overweight people.

As a rule, you should make forward progress, but without touching the pool floor.

It’s thanks to the minimal impact on the body that aqua jogging is basically a rehabilitation technique for pre- and post-surgery patients.

This is also what makes it ideal for overweight beginners.

Aqua jogging may seem easy, but don’t let that fool you.

It takes more practice and effort than you might imagine.

Make sure to start slow and increase both length and intensity as you begin to feel (and get) fitter.

You can find buoyancy belts at your local swimming pool or buy one online (check this one out).

Next, head to the deep end of the pool and start jogging.

Additional resource – YouTube channels for runners

3. Begin Strength Training

Hit up the weight room once you’ve built enough endurance with walking and/or aqua jogging.

This will help you build muscle strength, shift body composition, and get you toned.

But there’s more to it than that.

For obese individuals, lifting weights can help fix many of the postural issues that may arise as a result of carrying all of that extra weight.

It also helps improve joints’ range of motion.

Building strength in your body muscles can make it easier to perform daily tasks, like carrying groceries, climbing stairs, or playing with your kids.

What’s more?

Strength training boosts your metabolic rate—that means you burn more calories, even when at rest.

The more muscles you build, the merrier.

What’s more?

Begin with two to three full-body strength training workouts per week, leaving at least one full recovery day in between.

Proper form is king, so if you can afford it, invest in a few sessions with a trainer to work on the right technique.

Does the gym scare you?

Start at home with body exercises, like squats, push-ups, and lunges.

All of these are great exercises that you can do anywhere, and you can scale to your current ability.

Additional resource  – Trx exercises for runners

4. Join Group Exercises Classes

If you’re serious about keeping the momentum going, you’ll need a strong social support system.

Luckily, group workout classes are a great venue for meeting like-minded people.

There are many types of group workout classes to joint.

These include more strength-oriented classes (often called “core” or “sculpt”), classic cardio classes (such as spinning, step aerobics, and Zumba), etc.

Before you book any class, make sure to get a sense of the class by watching it first.

Just whatever you do, make sure the class is beginner-friendly.

Talk to the instructor ahead of time and explain your specific needs.

By connecting with them, you’ll be sending a strong message that you’ reopen to feedback and encouragement.

They can suggest a modification and extra guidance to make sure you’re comfortable during class.

Not yet ready for a group class?

Then consider investing in online streaming services  or a DVD so that you can work out at home.

Additional resource – How to find affordable running clothes

Overweight Guide To Starting A Workout Plan

Here’s a list of my favorite YouTubers who make excellent workout routines:

HasFit

Les Mills

Be Fit

Blogilates

BodyRock Tv

5. Listen to your Body

This is the most critical piece for advice for starting a workout plan—no matter who you are and your fitness background.

Anytime you go for a walk, hit the pool, lift weights, jog or whatever; you must take care not to overdo it.

You need to learn how to recognize signs of overexertion before it’s too late.

Of course, you should expect a bit of discomfort.

If it doesn’t challenge you, it won’t change you.

You should be sweating, your heart rate should rise, but vomiting or chest pain could indicate danger.

Stop exercising if you’re experiencing any of the following symptoms:

Overweight Guide To Starting A Workout Plan – The Conclusion

There you have it.

The above guidelines are all you need to get you started with working out while being obese.

Keep in mind that the type of workout and exercises you choose is less important than the fact you’re doing it.

Don’t hesitate about trying everything on this list to find an exercise program that you enjoy and can stick to.

Give yourself credit for sticking to your plan.

New to Running? Start Here…

If you’re serious about running, getting fit, and staying injury free, then make sure to download my Runners Blueprint Guide!

Inside this guide, you’ll learn how to start running and lose weight weight the easy and painless way. This is, in fact, your ultimate manifesto to becoming a faster and a stronger runner. And you want that, don’t you?

 Click HERE to check out my Runners Blueprint System today!

Don’t miss out! My awesome running plan is just one click away.

Couch to 5K Plan in 8 Weeks Explained

Getting into running can feel overwhelming—I’ve been there. Running can seem intimidating when you’re out of shape or new to fitness.

Remember, every runner begins with a single step.

Believe me, when I first started, circling the block seemed like a marathon.. But guess what? I did it, and so can you.

If you’re feeling hesitant, let’s talk about the Couch to 5K plan—a great starting point.

This program is perfect for beginners, guiding you from couch potato to 5K finisher in just 8 to 9 weeks.

As a coach, I love how simple and effective it is for new runners, and I’ve seen it work wonders for people at all fitness levels.

Let’s get to it.

What is the Couch to 5K Program?

The Couch to 5K is designed to guide absolute beginners from sitting on the couch to running a full 5K (3.1 miles).

It mixes walking and jogging to gradually build your stamina—Ideal for new runners or anyone getting back into it after a break

Josh Clark of Cool Running initially designed the C25K plan for his 50-something mother in the 1990s. Then, in 1996, Josh posted the plan on a blog called Cool Running.

Unfortunately, that blog has since been discontinued (acquired by Active.com for an undisclosed amount). Since then, the program has exploded in popularity.

The original plan involves three workouts per week with a recovery day in between and a different schedule for each of the nine weeks.

This is done by keeping each session doable by mixing jogging and walking to gently build a solid cardio base without overdoing it.

You’ll slowly increase intensity from one week to the next without you or your body noticing.

Over the past 25 years, hundreds of running blogs have copied and tinkered with this original plan.

There are eight and 16-week versions, and I’ve included my own C25K 9-week plan in this article. The initial program takes around nine weeks to finish.

In 2016, this beginner’s running plan was also turned into a free app called C25K, becoming one of the most popular fitness apps.

C25K quickly became one of my favorite tools when working with beginners.

It’s user-friendly and eases you in gently

Whether you’re a lapsed high school runner or a total novice, this plan works for everyone

How Long Does it Take?

A great feature of C25K is its flexibility. The standard plan takes nine weeks, but you can adjust it to suit your pace.

Some runners finish in 8 weeks, while others might take ten or even 12 weeks.

And that’s fine!

What matters is that you’re building a running habit, and that’s the real win.

Does Couch to 5K Actually Work?

In a word: YES. This starter plan has ignited the passion for running in millions

If you’ve ever doubted your ability to run, the Couch to 5K will change your mind.

How come I’m so confident?

The plan works like a charm because it tells you EXACTLY what to do without needing to figure it out on your own—as long as you’re good at following instructions.

You’ll be training three times a week for around 30 to 40 minutes each session. I suggest training every other day to ensure adequate recovery.

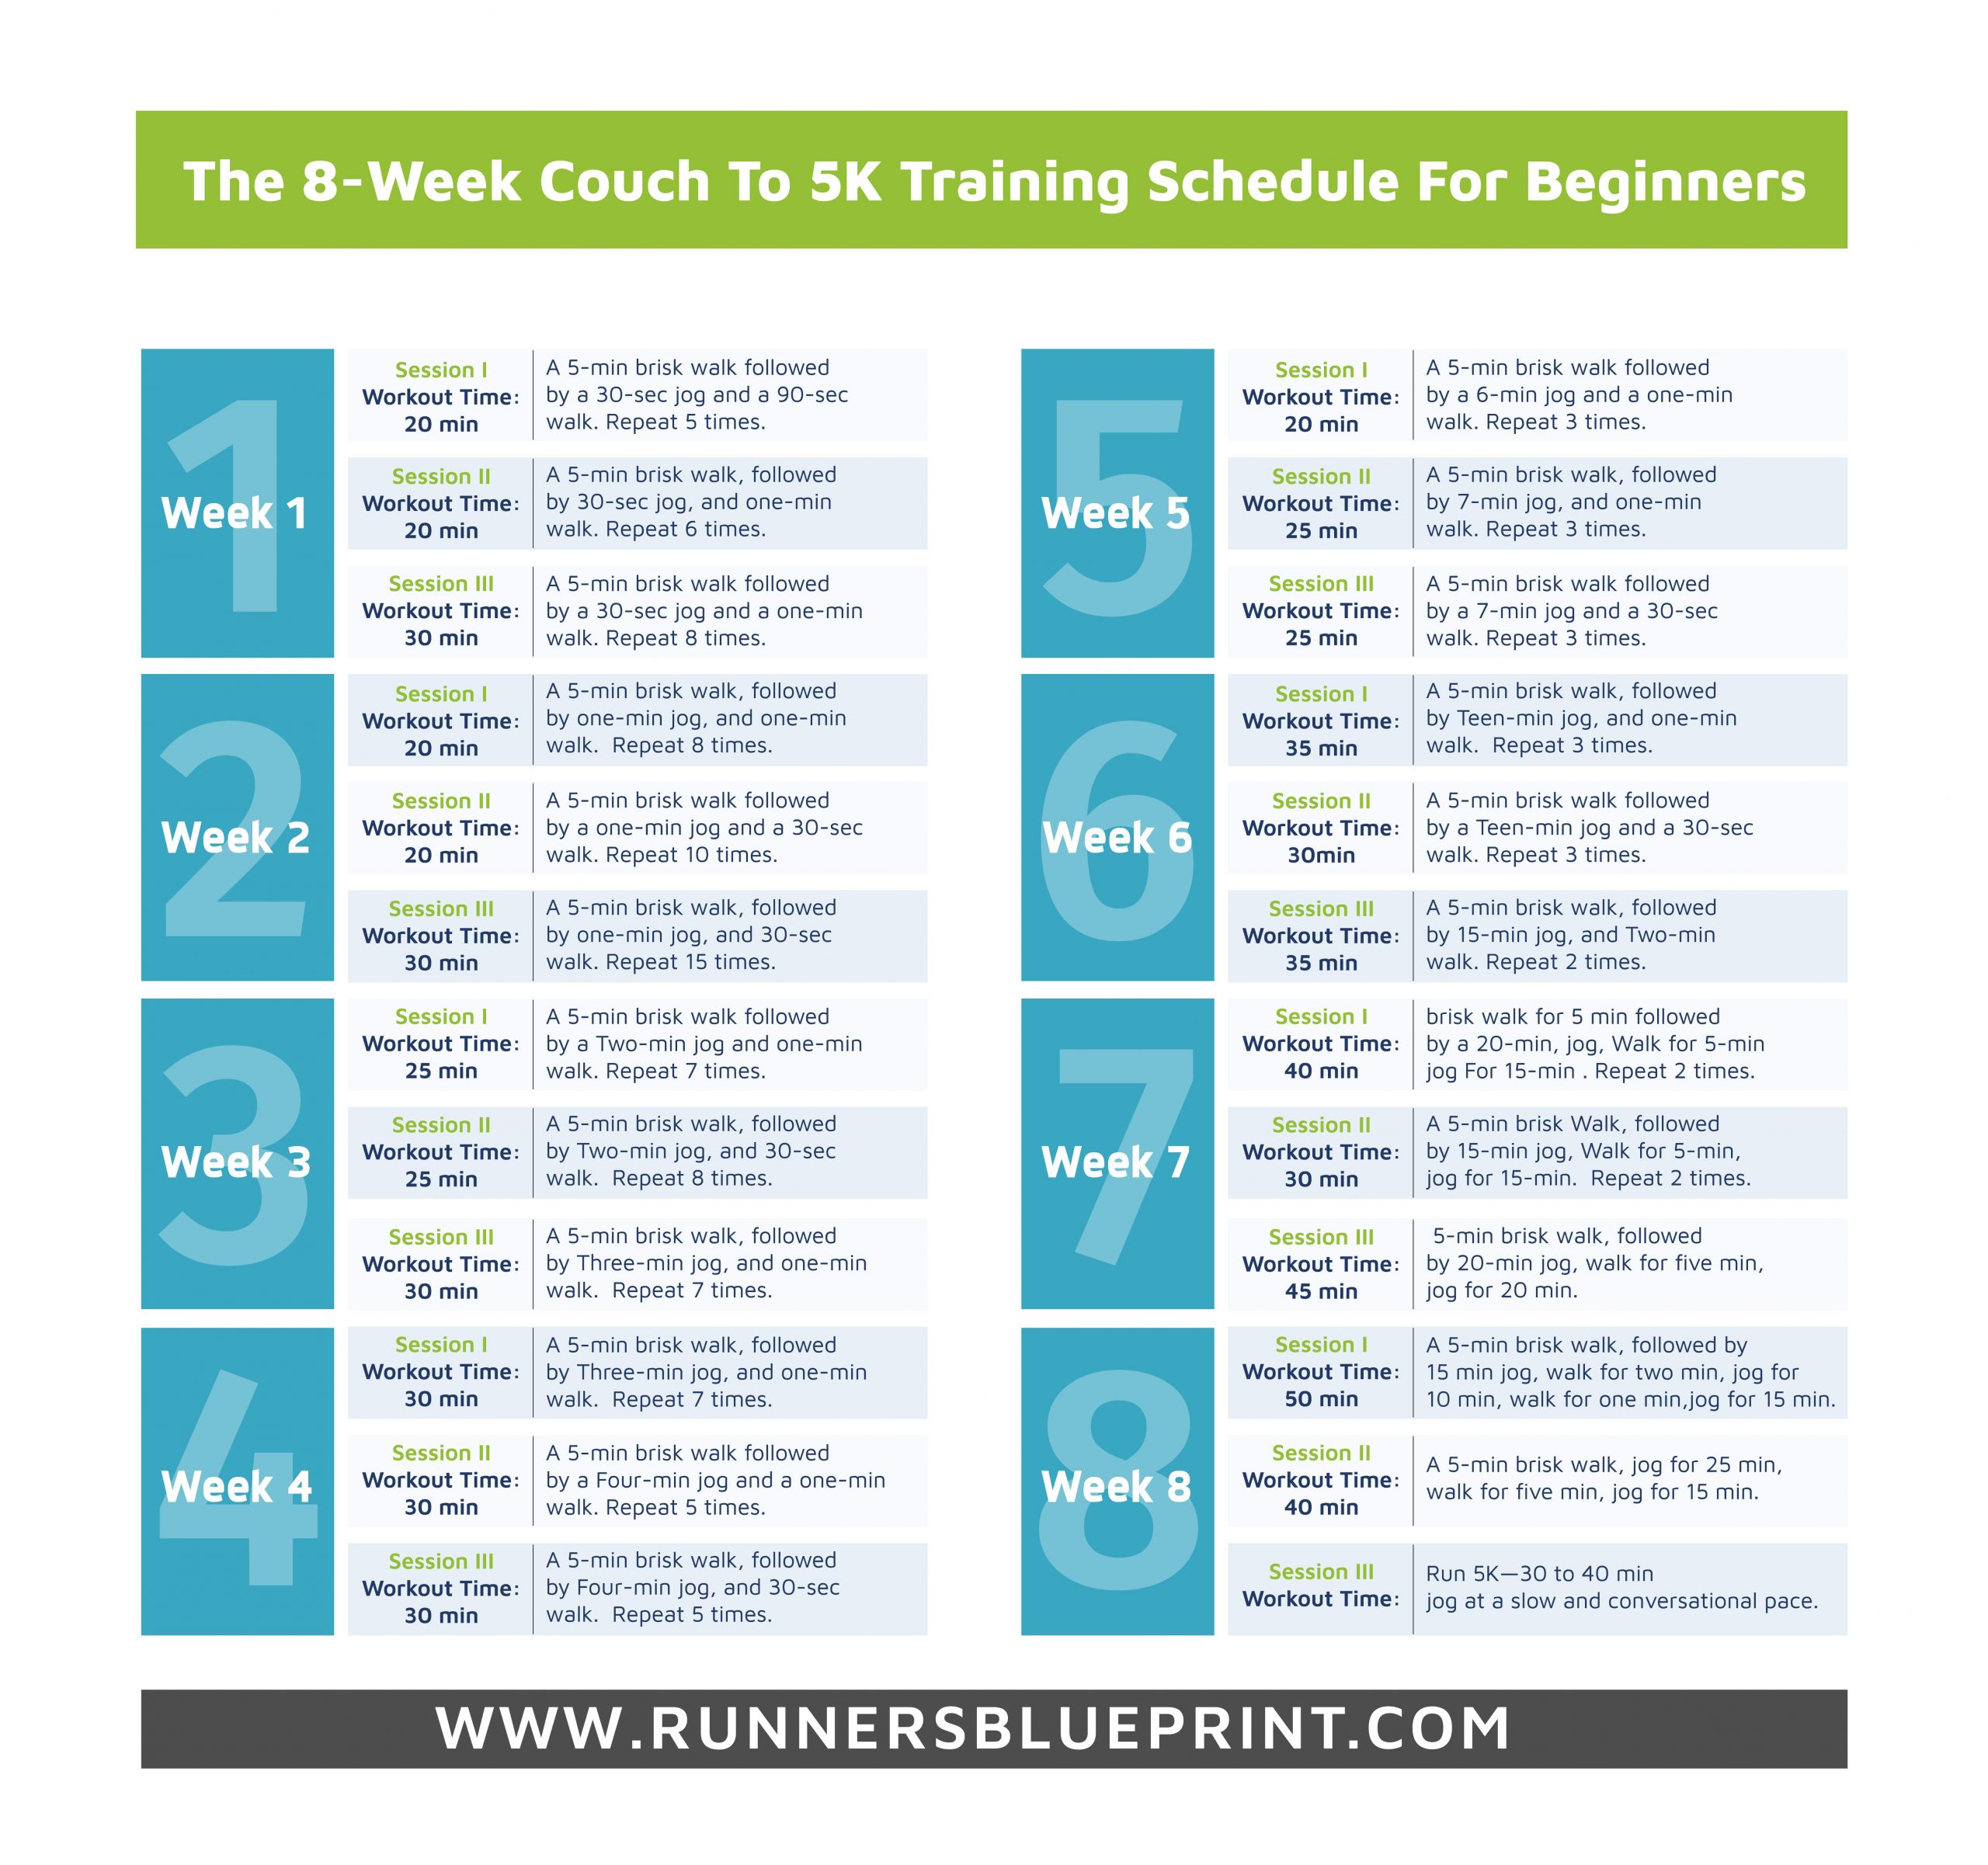
In the first week, you’ll start with six to eight one-minute jogging intervals.

Next, you tack on an extra 30 seconds to the jogging intervals in week two while adding a full-minute walking break between each jog.

Ideally, these initial sessions should feel almost effortless, making the program ideal for anyone who isn’t used to running—or exercise.

The Average 5K Pace

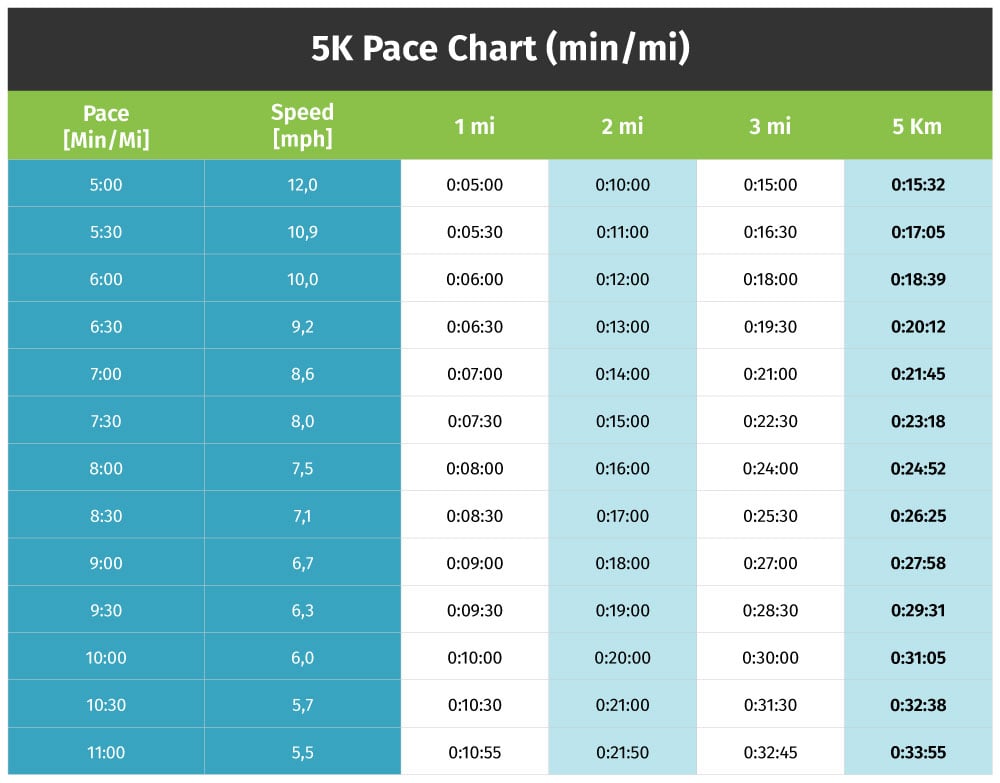
On average, men run a 5K at about 11 minutes per mile, and women at about 13., resulting in finish times of roughly 35 and 42 minutes.

Remember, the key term here is ‘beginner.

Experienced runners might manage a mile in 7 or 8 minutes, crossing the finish line within 20 to 25 minutes.

Check the chart below for more:

Get the full scope here.

You can also learn more about 5K paces here.

How to Train for Your First 5K

As you work through the beginner’s running plan, don’t forget to include a good warm-up and cool-down routine with every workout.

Warming up prepares your body for action, reducing the risk of injury and improving your performance. Cooling down helps your heart rate return to normal.

These steps are crucial to your training, so make sure not to overlook them!

Listening to Your Body

One of the most important lessons I’ve learned in my running journey is to listen to your body. Overdoing it too quickly can cause injurie like shin splints or a runner’s knee.

If something doesn’t feel right, take a break. It’s always better to miss one run than to sideline yourself for weeks because of an injury.

Eat Well

Food is fuel. Accordingly, the main objective of eating should be to fuel you up, not to fill you up.

I keep saying this because it’s so true.

We are, after all, what we eat.

Your diet can either speed you up or slow you down significantly, so pay attention to what you put into your mouth.

Check out the following post on how to maximize your nutrition.

The Couch To 5K Plan In 8 Weeks

This sofa to 5K schedule includes running, walking, and resting. This mix will help you get fit enough for a 5K distance without getting hurt.

Starting slow this way will help tame the risks of injury, fatigue, and stress while also improving your overall experience, endurance, and training enjoyment.

For example, during the first two weeks, you’ll jog for 15 to 30 seconds, then walk for one to two minutes, repeating for 20 to 30 minutes.

As training progresses, you’ll jog—and eventually, run—more while taking shorter and fewer walk breaks.

Once you get to the last week, you can run just over three miles without stopping.

That’s the ultimate goal of this beginner training program.

Pick three days of the week and ensure you don’t run consecutive days. Feel free to cross-train or rest on your non-running days.

Common Questions About Couch to 5K

While I can’t read minds, I bet you have some questions about starting my couch to 5K plan. No hard feelings.

Let me address some of the my common concerts.

What if I miss a week?

Life happens, and it’s normal to miss a week here and there. Missing a week isn’t the end of the world—just resume where you stopped or, if you feel like you’ve lost a bit of endurance, go back one week and resume from there. The most important thing is to stay consistent and not rush yourself.

Can I repeat a week if I’m not ready to progress?

Absolutely! Couch to 5K is all about building up gradually. If you find a week particularly challenging, repeat it until you feel confident moving forward. Remember, this is your journey—going at your own pace is perfectly fine.

I’ve Never Ran Before. Will I be able to improve?

The C25K plan is designed for beginners—like complete newbies without running experience.

You’re on the right path as long as you do the sofa to 5K at your own pace.

As a beginner, you’ll need time for your body and mind to adapt to running.

Push harder than last time, and you might develop injuries like Achilles tendonitis, runners knee, shin splints, or plantar fasciitis.

Will the Couch to 5K Plan Help me Lose Weight?

A lot of people take up running hoping to lose weight. And yes, running can help, but it’s not a magic bullet.

Running burns calories, but you must combine it with a healthy diet to see results. Think of running as one part of the bigger picture—fitness, nutrition, sleep, and stress management all play a role in achieving your goals.

So if you run for 60 minutes, get home, and stuff your mouth with junk food because you feel stressed at work and aren’t sleeping well, you won’t shed many pounds.

In other words, how much weight you’ll lose (or if any) while running completely depends on your body and the variables I mentioned above.

Do I need special shoes for Couch to 5K?

Yes, having a good pair of running shoes can make a big difference in comfort and help prevent injuries. Look for shoes that provide support, fit well, and are designed for running. Check out our Beginner’s Guide to Choosing Running Shoes for tips on finding the right pair.

How do I handle soreness or tiredness after a session?

Soreness is common when starting a new program, especially in the first few weeks. Make sure to stretch after each session, stay hydrated, and listen to your body. If you’re feeling overly tired, it’s okay to rest an extra day. Recovery is an important part of your progress!

Can I do Couch to 5K on a treadmill?

If running outside feels intimidating or the weather is an issue, you can complete this beginner’s running plan on a treadmill.

It’s a great option for those who prefer a more controlled environment for their workouts. I even have a guide on treadmill running to help you get started if that’s more comfortable for you.

What if I can’t run for the full time during a session?

That’s okay! Try your best, but don’t feel discouraged if you need to slow down or take a few extra walking breaks. The key is to keep moving and build up your endurance gradually. Every step forward counts.

Should I focus on time or distance?

In the beginning, focus on the time rather than distance. Couch to 5K is designed around time-based intervals to help you gradually build stamina without feeling overwhelmed by mileage. Pace yourself and trust the process.

What’s next after I finish Couch to 5K?

Once you complete Couch to 5K, you might want to try improving your 5K time, training for a longer race, or simply maintaining your new running habit. For those ready to take the next step, our guide on Moving from 5K to 10K can help you build on the fitness foundation you’ve created.

Check out my guide on Moving from 5K to 10K for tips on progressing to your next milestone!

Further Reading and Resources

For those interested in learning more about the science behind Couch to 5K and progressive running programs, here are some additional resources:

  • Runner’s World: “The Science Behind Couch to 5K Programs” – Link
  • American Council on Exercise: “Interval Training for Beginners” – Link
  • Journal of Strength and Conditioning Research: “Benefits of Incremental Training Programs for New Runners” – Link

Join the Conversation: Share Your Couch to 5K Journey!

Starting a new running routine like Couch to 5K is a big step, and every runner’s journey is unique. Whether you’re on Week 1 or have just crossed your first 5K finish line, we’d love to hear from you!

  • Share Your Experience: How is the program going for you? Do you have any personal tips for sticking with it?
  • Ask Questions: If you’re facing challenges or need advice, feel free to ask. Our community is here to support each other!
  • Celebrate Milestones: Let us know about your progress—every step counts!

Leave a comment below and connect with fellow runners. Your story or advice might be exactly what another runner needs to keep going!

Found This Guide Helpful? Share It with Fellow Runners!

If this Couch to 5K guide has helped you, consider sharing it with friends, family, or anyone who might be interested in starting their own running journey. Together, we can build a supportive community of runners who motivate and inspire each other!

Lose 100 Pounds Safely – The Fast Track Guide That Works

If your goal is to lose 100 pounds or more, it usually means that your weight is high enough to put you into the obese or morbidly obese category.

When it’s the case, you’re at an increased risk for a whole range of health issues including high blood pressure, diabetes, heart diseases, some cancers, etc.

Here’s the good news.

Losing those extra pounds can help cut the risk. It’s also going to make you feel better overall. That said, trying to lose that colossal amount of weight can be a testing process. It won’t happen overnight, for sure.

But rest assured that with the proper mindset, adequate exercise, and the right diet program, you can do it.

Taking it one step at a time and making a few minor changes to your exercise, nutrition and lifestyle makes weight loss much more achievable and manageable.

But first things first, how quickly can you lose 100 lbs? Let me explain

How Long Does it take to Lose 100 Pounds?

I hope I’d the exact answer. I hate to break it to you but the process of weight loss is a little bit complicated. It’s also non-linear, meaning that losing 10 pounds last month won’t guarantee that you’ll lose the same amount this month as well. This is one reason so many people get frustrated with weight loss plans.

But over all, with the right diet, exercise, and lifestyle choices, you can realistically set a goal of losing a 100 pounds within a period of 12 to 18 months. That amounts to to 1-2 pounds per week.

But, remember this is just an estimate from my own experience. I read stories about people who were able to lose a 100 pounds in six months, but I think it’s rare. So I’d recommend you keep your expectations realistic (more on this later).

How To Lose 100 Pounds?

Without further ado, here are my best guidelines and tips on how to lose 100 pounds  the safe way. I hope you find them useful.

  1. Start with Realistic Goals

Your first step to losing 100 pounds starts with a realistic goal, especially when it comes to how long it’s going to take.

Losing that amount is a challenging goal and will require you to wholeheartedly commit to your plan for an extended period.

You didn’t put on 100 pounds overnight by eating more slice of pizza than you should. Instead, you gained it so slowly that you didn’t realize it’s happening until it was too late.

Therefore, you’re not going to lose it like some infomercial.

It won’t happen overnight, or in a week, or a month, even likely over a year. You’ll need to think long term and never lose sight of your main goal.

In general, a healthy weight loss rate is one to two pounds a week.

It might take one to two years to lose 100 pounds. If you’re lucky, you can reach this in 50 weeks.

Sure, one year is a long time to wait and see your weight goal coming true, yet it beats the alternative of staying fat and sad for life.

2. Start Exercising

Regular exercise, especially aerobic training, is great for burning calories and shedding the pounds. However, if you’re already too overweight, exercise—as in intense and hard training—can be too much on your body.

Shoot for at least 150 to 180 minutes of moderate-intensity exercise each week. Some of the best cardio exercises include power walking, jog-walking, biking, swimming, or using the elliptical.

I’d recommend that you start your journey to losing 100 pounds with walking. You can begin walking or jog-walking for 20 to 30 minutes a day. Work it up to 45 minutes then increase it again. Just make sure it’s done in a very gradual and slow manner.

Most importantly, find an exercise program that you genuinely enjoy. That way you’ll be more likely to stay consistent to it over the long haul.

Experiment with various types of workout program. This will help you get a good idea of what type of training routines will most like to keep doing long term.

Additional resource – Running with diabetes


3. Write A Meal Plan

Getting on the 100-pound loss journey will require you to rethink your eating habits.

You can never sustain a fad, restricting diet, so you gonna have to design your own healthy, weight-loss friendly, eating plan.

Once a week, preferably on a Sunday, sit down and plan out every one of your meals and snacks for the next seven days.

Start with seven days of meals. Plan out your breakfasts, lunches, dinners, snacks, and healthy drinks.

Once your plan is done, post it up where you can see it so every day you’re reminded that you have a plan.

As you get into the groove of healthy meal planning, your eating plan will get less complicated as you get to know what works the best for you.

I’d recommend that you find a few meals you like the most then stick to them. This will help you save a lot of time and headache.

Here’s a great resource on the right diet program.

4. Get Rid of Unhealthy Food

Declaring your home a junk-food free zone can be a complete game-changer for losing weight.

Why? Because it creates a healthy environment that supports your weight loss—instead of being a hindrance to it.

As I always like to say, out of sight, out of mind—and mouth. The more junk food you have laying around, the more likely you’ll give in to temptation.

Get rid of anything that’s unhealthy that includes chips, cookies, crackers, cupcakes, ice creams, and sweet beverages, such as fruit juice and soda. All these items have to go.

Instead, load up your pantries with fresh vegetables and fruits. Keep these at eye level. That way, you’re more likely to reach for something healthy.

5. Keep Track

You cannot improve on what cannot be measured. This is true whether you’re the CEO of 500-fortune company or simply trying to lose 100 pounds.

Keep a daily record of your weight, blood sugar levels, water intake, blood pressure, amount of sleep, mood, length and intensity of your exercise, and everything you put in your mouth.

Don’t take my word for it. Research shows that keeping track while trying to lose weight makes it more likely that you’ll achieve your goals and keep the extra pounds off long term.

This also should serve as a reference point to which you can look back and take stock of how much progress you’re making.

Additional resource – Here’s how to lose body fat.

6. Track Your Progress

Keep your eyes open on all signs of weight loss. The numbers on the scale are not scripture, and they shouldn’t be the only source of feedback you have.

As you stick to your program and lose weight, you’ll notice a major change in your body composition—you’ll see your body shape changes as well.

Use this feedback a way to push yourself and as a way to determine what works the best for so you can make the right changes. The more pounds you shed, the more motivated you’ll feel to keep going. That’s simply human nature.

Here the stats to keep track of:

  • Keep track of how your clothes fit
  • Keep track of how you feel from day to day.
  • Measure the circumference of your thighs, waist, neck, and arms.
  • Measure your body fat percentage

7. Get a Support System

Having the right support system around is a non-negotiable. It’s what’s going to help you keep going whenever you feel like quitting.

It will take a long time to reach your weight loss goal, and it may be along the journey, having the right support system to motivate and encourage you is supercritical.

Find positive people that can hold you accountable and be there for you when you need them for emotional support.

What’s more?

Look up in person or online support groups—there are plenty to go around—and join as many social media groups as possible. That way you’re more likely to meet people who are going through the same ups and downs, which will make you feel like you’re not alone.

100 pounds

8. Expect Plateaus

This is a hard pill to swallow for most.

You’re doing all you’re supposed to be doing—exercising, eating healthy, keeping track of everything–but the scale won’t bulge. This can be quite frustrating.

Here’s the truth.

Don’t worry if you hit a plateau. There will be points where your weight will fluctuate for what it seems like an eternity. Don’t let that deter you.

Plateaus happen to everyone. They’re a sign that you have to figure out what’s wrong with exercise and/or diet plan.

Don’t feel so defeated when—it’s just a matter of time—hit your first plateau. Instead, keep doing the good work. You’ll eventually change the way you’re working out or eating, and try different approaches, and eventually break through the plateau.

Stay focused, keep pushing through, and never give up. It’s only a failure when you give up.

Have faith in the infinite wisdom of the universe—or something like that.

The Conclusion

There you have it! These diet, exercise, and lifestyle measures are some of the best things you can do right now to get on the path to lose 100 pounds or more in a relatively short—but very realistic and healthy—time frame. You just need to start today—and never deviate. The rest is just detail.

Please feel free to leave your comments and questions in the section below.

In the meantime thank you for reading my post.

Keep running strong.

David D.


Does Running Help you Last Longer In Bed?

picture of sex

I hate to state the obvious but running is a fantastic way to reduce stress, boost your memory, improve cardiovascular health, and help you live a longer, healthier life.

But did you know that running can also give your sex life a serious boost?

Yes, that’s right—running can improve your sexual performance and satisfaction in ways you may not have expected!

So, how exactly does pounding the pavement spice up your intimate life? Let’s unpack this

Feel-Good Chemicals That Boost Your Libido

Let’s be real—how you feel about your body can have a huge impact on your sex life. Running helps you get fit, and as you improve your body, you naturally start feeling more confident about your appearance. Whether feeling proud of your progress or appreciating what your body can achieve, running builds confidence, making you more comfortable and expressive in bed.

Research from the University of Arkansas found that physically fit individuals rated their sexual desirability higher than those who were less active. It’s simple—when you feel good about your body, you’re more likely to feel confident about being intimate. In a Runner’s World survey, 90% of respondents said running gave them more body confidence in the bedroom. So, if you’re looking for a self-esteem boost, lace up your shoes and hit the pavement!

Improved Confidence

Here’s a fun fact: running can actually improve your stamina in bed!

A study published in the American Journal of Cardiology found that increased running endurance correlated with increased sexual endurance. Every extra minute you can run on a treadmill might translate into an additional two to three minutes of sexual activity. So, the fitter you are, the longer you might last in bed.

Trust me, improving your running stamina can boost your endurance everywhere—even in bed. And trust me, your partner will notice this, too.

Your Orgasms Get More Intense

Looking for more intense climaxes? Running could be your answer.

Research from Finland that examined over 5,500 women in their 40s and 50s found a positive link between regular aerobic exercise and improved sexual satisfaction, including more intense orgasms.

Another study conducted at the Center for Marital and Sexual Studies found that individuals who exercise regularly are not only more likely to orgasm but also experience orgasms more easily and frequently.

So, hitting the trails can do more than just improve your fitness—it can enhance your sexual experience, too.

Your Orgasms Get More Numbered

It’s not just about quality—running can also improve the quantity of your orgasms. A study from the University of California found that participants who engaged in moderate exercise four times a week had 30% more sex and experienced 25% more orgasms after following their fitness routine for nine months.

For men, running can lead to higher testosterone levels, which not only boosts sex drive but also combats hypogonadism, a condition that reduces the production of sex hormones. This condition often leads to sexual disorders like erectile dysfunction. In short, running can help you feel more energized, active, and ready for intimacy.

Running Makes You More Fertile

Running doesn’t just improve your sex life—it can also enhance your fertility. Being overweight or inactive can negatively impact fertility, but regular running can help you maintain a healthy weight and boost fertility in both men and women.

I’m not at the stage of life where I’m thinking about kids yet, but I’ve read about how running can impact fertility. There’s plenty of research showing that staying active can improve sperm quality and boost fertility in both men and women.

For men, studies have shown that running at least three hours a week lowers the risk of impotence by 30%. For women, regular exercise reduces the risk of infertility due to ovulation disorders, according to research published in Obstetrics & Gynecology.

So, if you’re planning to start a family, running can help boost your chances of conception.

Doing It Too Much

As great as running is for your sex life, there is such a thing as too much of a good thing.

In fact, too many miles each week—logging 60+ miles a week—you might reduce your sex drive.

Again, don’t take my word for it.

A study from the University of Connecticut found that male runners who clocked serious miles saw a 30% drop in testosterone levels and a decline in semen quality.

Why? Running too much can lead to a significant reduction in body fat, which affects hormone levels.

Tight clothing (like compression shorts) can also harm sperm quality by creating too much heat in the reproductive area. Balance is key—running in moderation will help boost your sex life, but overdoing it could have the opposite effect.

Actionable Tips for Balancing Running and Sexual Health

To get the most out of your running routine—both for performance and personal life—consider these simple tips:

1. Aim for a Balanced Weekly Mileage. For most runners, keeping your weekly mileage between 15-25 miles is a sweet spot. This range supports cardiovascular and hormonal health without the fatigue that can come with higher mileage. If you’re training for a race and need to up your distance, remember to increase mileage gradually and allow for recovery.

2. Incorporate Rest Days. Rest is as important as your training days. Including at least one or two rest days each week can help prevent overtraining and give your body a chance to recover, which is essential for maintaining healthy hormone levels. Rest days don’t mean inactivity—try light stretching or yoga to stay loose and relaxed.

3. Listen to Your Body. Fatigue and soreness can be signs that your body needs a break. If you’re feeling extra tired, or your libido is lower than usual, consider adjusting your workouts. Balancing intensity and rest is key to keeping both your physical and personal life thriving.

4. Add Strength Training. Adding strength sessions 1-2 times a week can enhance your running performance and support your overall health. Stronger muscles aid in better endurance, reducing fatigue and leaving you with more energy outside of running.

5. Stay Hydrated and Eat Well. Proper hydration and balanced nutrition go a long way toward overall wellness and energy. Drinking enough water and fueling with nutrient-rich foods ensures your body has what it needs to support both your running goals and a healthy libido.

The Conclusion

If there’s one thing I’ve learned from years of running, the benefits extend beyond the physical.

Sure, it makes you fitter, but the boost it gives to your mental and emotional well-being is just as important. And yes, that includes your sex life.

So if you’re wondering whether running can help you last longer in bed, take it from me—it absolutely can.

Feel free to leave any comments or questions below. In the meantime, keep running strong!